

A quick tutorial on how to use layered photo masks, for the tutorial I created a Christmas Card but the technique can be used on any layout too.
Layered Photo Masks
How to use them and how to create a quick and easy Christmas card.
For this tutorial, I used Christmas Layered Photo Masks and Santa’s Eve by Wisteria Moments.
Make a new document approximately 5 x 7
Open your background paper and drag it into the layout. I used a paper from Santa’s Eve kit.
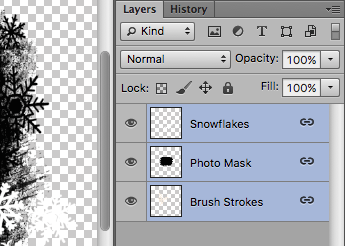
Now open the Christmas Layered Photo Mask. This will open a new window, which will contain three layers for the mask.

In the layers palette select all three layers.
To do this, click once on the top layer to select it, then hold down your Shift key and click on the bottom layer. This will select the top layer, the bottom layer, and all the layers in between.
Drag all selected layers into your new document and adjust the size accordingly.
Bring the photo into your document and place above the black layer mask named photomask as shown in the images below.

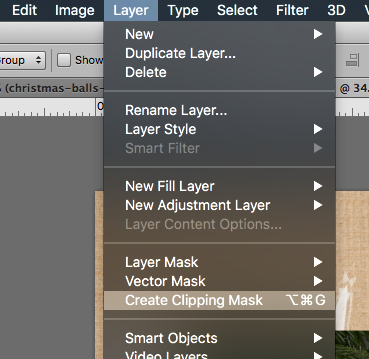
Resize the photo and then clip your photo to the mask. To do this, select Layer in the menu bar and then select Create Clipping Mask. Or to use the keyboard shortcut it is – Command-Opt + G for (Mac Users) and Control-Alt + G (Win Users)
To finish just add some embellishments and word art. I also added a white stroke around the background paper and elements from Santa’s Eve.

